
The kitchen is the heart of the home, or so people say. We connect many of our memories with this space. So, it is a space in the home which needs special attention.
The lighting of the kitchen space can have several layers. There are a few surfaces which need to be properly lit (the countertop) and surfaces which may request a special type of lighting. Depending on the room geometry and how the kitchen itself is disposed, there are a few lighting techniques which you can use to beautifully light your space.
Most importantly though, is that with whatever lighting equipment you choose, that you place it in such way as to avoid looking directly into the light source, i.e. avoid glare. Also, you’ll need to direct the light where you really need it or where you would like to highlight. So, here we go with the lighting tips for the kitchen:
- The countertop should be the best lit surface in the kitchen. It’s where most work is done and where you really need to be able to see things well. That’s what we call functional lighting. For that, lighting that is placed just above the countertop, usually on the underside of the cupboards is the best. I like to use light lines instead of light points, because that way the light gets more homogeneously distributed on the surface, and there are no scallops on the wall. But you can choose either. The main thing is that you have enough light on the surface to work.
If your kitchen is designed in a way that the windows are directly lighting the countertop or some part of it, you are really lucky! Daylight is the best light source anywhere and additionally you get to look outside. At night, make sure you can make up for this lighting with luminaires installed above your head (but not behind you, as you would want to avoid shadowing your working surface).
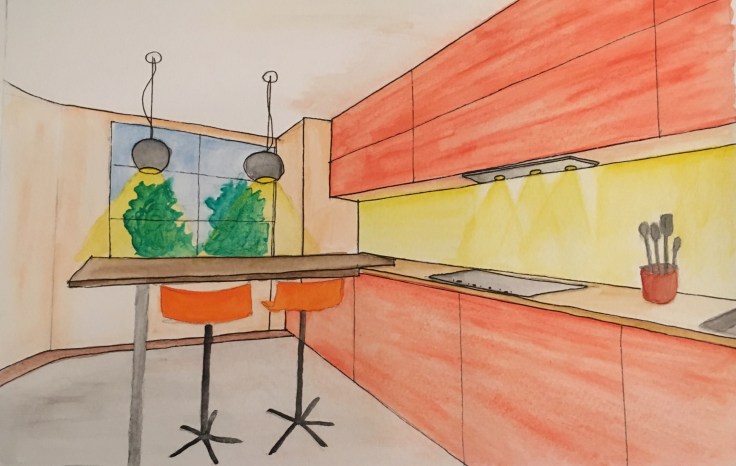
- The kitchen will also need something that we call general lighting. It’s the lighting that is usually installed on the ceiling. But that doesn’t necessarily means it can only be done this way. You can get general lighting through the fixtures which are dedicated to light the cupboards (also installed at high level), or even through decorative lighting. A mixture of direct and indirect lighting is also welcome. Here I’m showing an example where part of the countertop is lit through downlights installed on the ceiling (for direct lighting) and indirect lighting installed above the cupboard spreads some indirect lighting into the space.

In that sense, do integrate the lighting equipment to the furniture wherever you can. The kitchen, the surfaces and objects are the things to be appreciated, not the lighting equipment (unless it’s a decoration object).


Most of the kitchens nowadays serve also as eating space with either a proper table next to it or an extension of the countertop which serves as eating place. For both, dedicated lighting is appropriate, either in form of direct lighting, just highlighting the horizontal surface, or in form of a decorative element, a pendant luminaire for example. The main point here is to create a special atmosphere, or highlight this special place. So, here comes the next tip:
- If you are keen to use a decorative luminaire, a pendant, make sure is it giving the light you want. Some pendants are distributing light only downwards, some are diffuse light objects and some can be adjusted. Very important here, is that you choose the right height for your luminaire, in such way that you either hit the luminaire with your head when standing, nor are you blended by it when seating. As a rule of thumb, you can place the luminaire at around 75cm above the table surface. But attention, this is only a rule of thumb and the position of the pendant needs to suit your needs. For example, if you have small children at home, they might be disturbed by the light if the luminaire is positioned too high. Also, there are many types of different luminaires and ideally you would like to test the mounting height first, before finalizing installation.

Another way to add sparkle to the space, is to create a second focal point. Sometimes the walls have a nice texture, or are filled with family photos, which are worth highlighting. For both, there are different methods:
- If the wall has a texture worth highlighting, this could be done via “graze lighting” (as shown in the drawing with blue chairs). It is basically very narrow light beams (e.g. recessed downlights) placed close to the wall. That way, the texture will be visible through light and shadow created by the downlights.
- If the wall contains pictures, then a “light wash” would be more appropriate. For that, wider light beams (also as recessed downlights, or track mounted spotlights in case you cannot recess in the ceiling) placed at a distance from the wall would do the trick. As a rule of thumb, this distance should be around 1/3 of the room height. That way, the images will be beautifully lit, without creating too much shadows.
Something quite important to think about is the light colour you would like to use. If you have warm materials (like wood) or warm colours in your kitchen, then you might like to use a warm light colour (around 3000K – warm white). If the kitchen is designed using cooler materials (e.g. glass or stainless steel) and cooler colours, then probably a light colour of around 4000K would be more appropriate (neutral white). Watch out when choosing your lighting equipment, as most decorative lights are equipped with warm light tones.
And if you manage to have different layers of light in the kitchen, then you might as well like to switch them separately. Different switching circuits are essential for you to make most of the lighting design in the space and help you create a nice atmosphere for different occasions. Sometimes dimming the lights can be a nice way to create atmosphere too. Think about dimmers if you would like to achieve this effect.
If you are uncertain on how to light your space or even which lighting equipment to use, talk to our lighting designers. We’d be more than happy to help you out with that task.
And let us know:
- if you need some help with your space;
- if you would like further tips on the lighting equipment;
- if you have tried our tips!
See you in the next post.
#thelightingtips © all rights reserved
(((This blog is not sponsored. The ideas shown here are our own and based on years of experience working with light and talking to users. If you have any questions or comments, please let us know. We’re happy to help.)))

Leave a comment